“Heh, that’s all the challenge this place has? Next time, don’t send a grunt to do a Boss’ job.”
Self Critique: There was some internal debate with myself over the flexed knee and whether to have the line and shading follow the musculature of the knee, or the wrinkles of the boot. The shading of the abs might’ve made them a bit more bulbous than I would’ve liked them to.
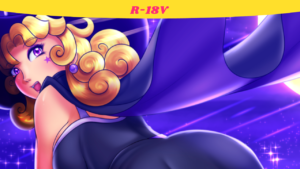
Here’s the next commission in the trio of commissions I took back in November (and earlier in 2019). This is Saruko, KayEych’s OC, dressed at 2P from NieR: Automata (the color-swapped version of 2B). After seeing the character and what outfit she’d be in, I figured doing a strong pose would be the way to go. And one way to make it work would be at a low angle. Early on I wasn’t too sure if the angle would communicate the “dominating” intent all that well. Learning from previous times I’ve done it, I tilted the angle to see if that’d help, and sure enough it did. Also decided early on to make the tail whip around instead of slumping down like I did during the construction line phase. There was also a lot of perspective warping during the construction line and 1st sketch phase to make Saruko’s legs and the robot appear closer to the viewer.
It’s not often I do it, but when I was shading this in, I left the abs LAST on the list of things to shade in. One of the pitfalls I fell into when I worked on Sonia Belmont late last year was trying to shade in the abs and having a lot of trouble with it since it was something I was new at. The way my workflow goes when shading in a character is that I start from the bottom of the character and work my way up. I stayed stuck on the abs and didn’t continue to the rest of the body for nearly a month. So when I returned to it, I was like “You know what, leave the abs alone and come back later when everything else is done.” So I applied what I learned then to this pic, and left the abs alone until later when everything else was shaded in. This helped with the workflow, enabling me to finish shading everything in within a week (as opposed to a month with Sonia Belmont). I still need some practice with shading in abs at different levels of musculature. And even though it’s got some issues (as mentioned in the self critique), I’m slowly but surely getting used to some of it.
Since I took a while on this pic (I wanted to finish this back in February), I added a somewhat simple environmental background for my client. The buildings and traffic light are taken from photos I took around New York City last year whenever I left work. The building in the middle is the clock tower from the Flatiron District, same with the traffic light. The building on the far right is a random building about 5 minutes away from Rockefeller center. I took these three and did some simple Hue Saturation/Filter editing to get them to the colors I wanted them to be at. I usually don’t do backgrounds like this since I’d rather draw all of the elements fully (either freehand or traced), but it’s the least I can do for the lateness. I referred to the background book I bought from J-List to draw the fully cloudy sky (first time for me). The dust became somewhat second nature to draw thanks to my work on the Piccolo and Gohan commission and the Eliza commission I did last year. The sparks from the robot pretty much followed the same flow as my current method for drawing fire (albeit with slightly different brushes).
Overall this pic was a success with what I wanted to accomplish with the angle and the lighting.
Done on Clip Studio Paint Pro. Cintiq 16 tablet used. Body-chan model traced for construction lines, then drawn freehand the rest of the way. Background elements assembled from my own photographs.
Saruko © KayEych. NeiR: Automata © Square Enix/Platinum Games
![[Commission] Desolate City ~ Saruko x Nier Automata](https://artofdpx.com/wp-content/uploads/2020/08/Saruko-Complete-Small-1.png)


This Post Has One Comment
Pingback: [Commission] The Cat Burglar – Ms. Fortune (Skullgirls) – Blue Fish Apartment